25 Best Gifts for Digital Artists in 2020

This is the 2020 gift list to inspire your favorite digital artists!

Looking for the perfect, thoughtful gift for your favorite illustrator or painter (including yourself) this year?  Have a browse through the best 25 gifts for digital artists in 2020.  They’re all hand-picked favorites, each one approved by the artists on the Paintable team!

Some of these items are affiliate links, meaning if you purchase them, Paintable may earn a small commission to help support our free tutorials (at no extra cost to you!).  So you’ll be doubly supporting digital artists.  🙌  Win-win!

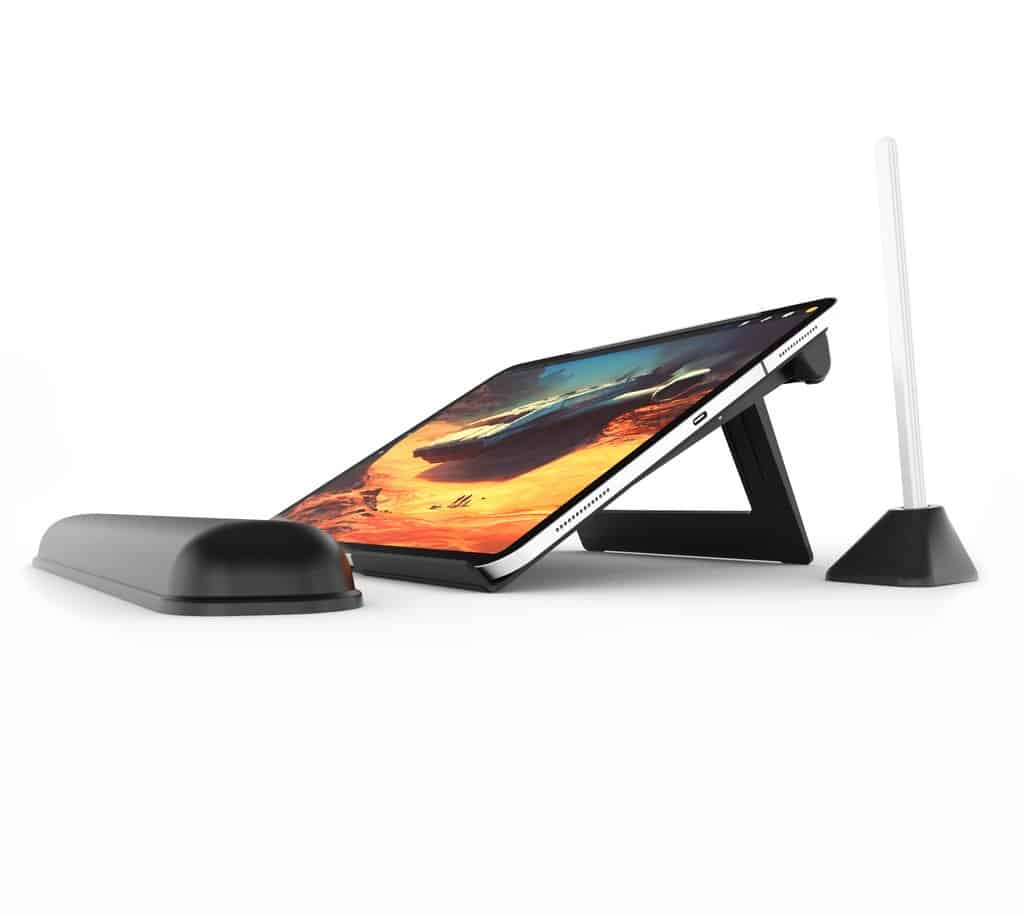
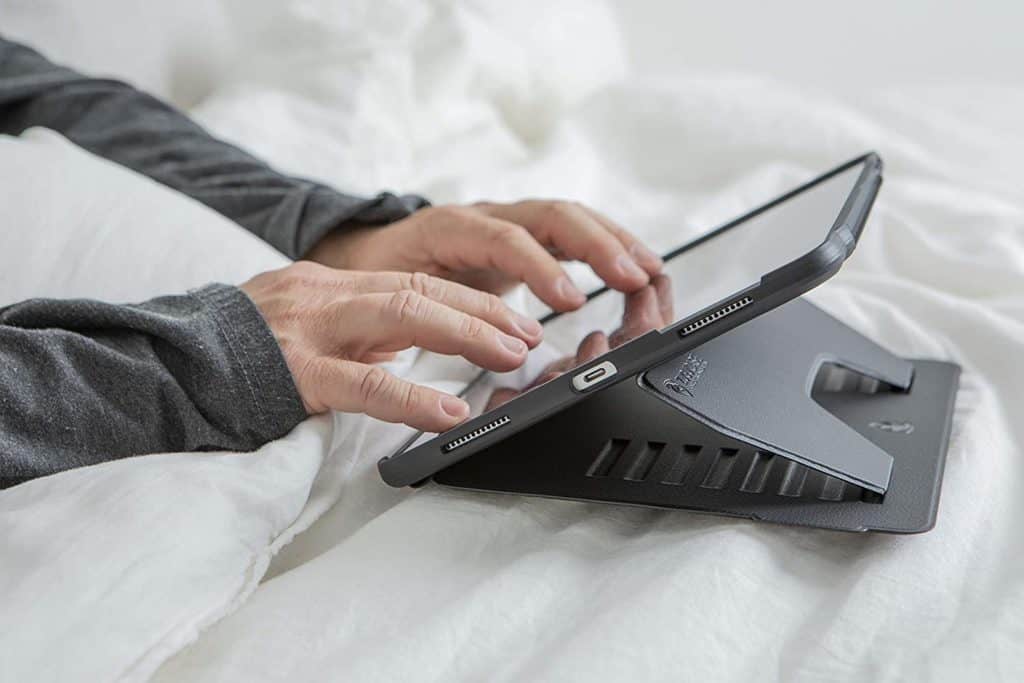
Draw on your tablet all day without fatigue with this ergonomic elevator stand designed by & for digital artists! David uses this daily, and loves the wide adjustment range. 

Price Range: $$
🎁 Get it here 

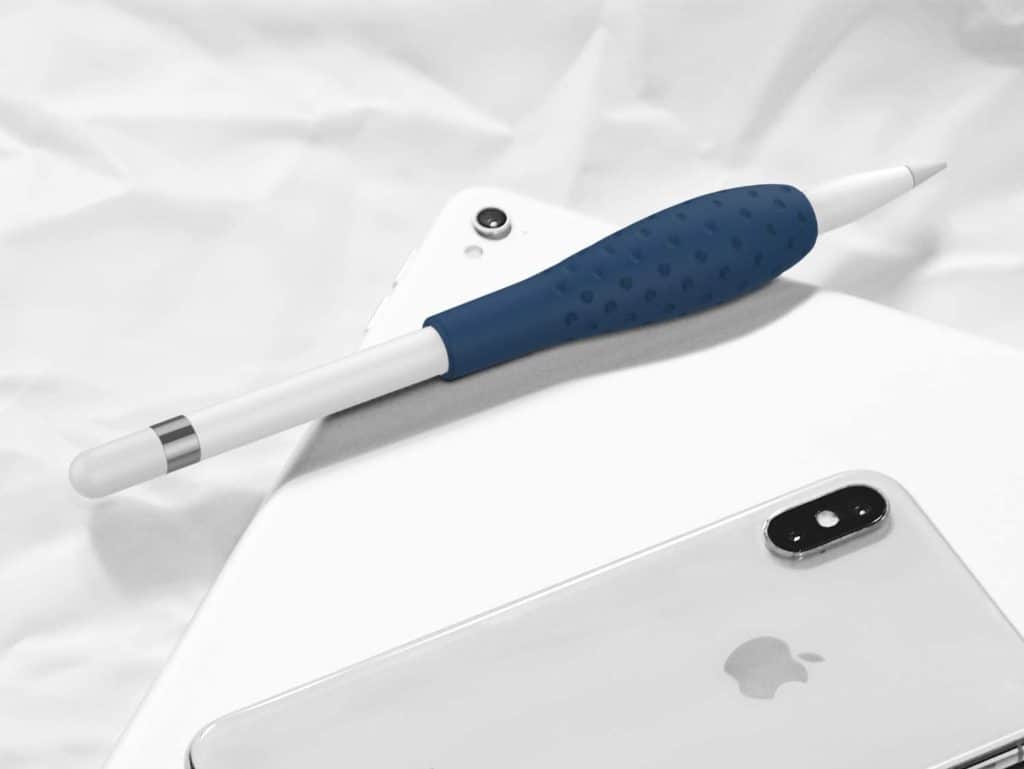
Here’s a stocking stuffer that will bring your favorite artist some colorful comfort every time they pick up their Apple Pencil! They’ll get a better grip with this silicone sleeve that comes in multiple colors.

Price Range: $
🎁 Pick a color set here.  

Smudging your artwork because of your hand resting on the tablet can be so frustrating. This glove saves you from that, reduces friction, and keeps your thumb and first two fingers free to feel the stylus. Works on either hand! 

Price Range: $
🎁 
Get it here.

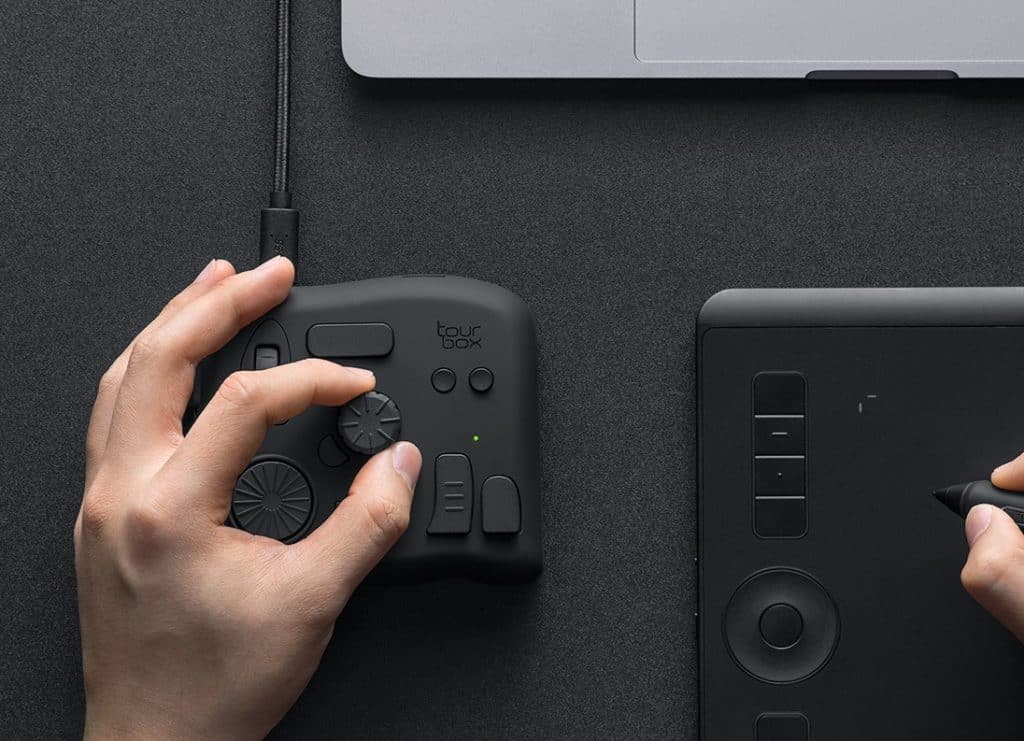
Want to speed up your workflow, and get some repetitive motion stress relief for your hand & wrist? Tourbox is a new controller that does that by replacing shortcuts and keyboard inputs. Program the buttons to your own preferences- works with Photoshop, Illustrator, Lightroom, Premier, Affinity Photo, Canva, and other graphic design, drawing, video, and audio editing software. 

Price Range: $$$
🎟 
Use Paintable’s coupon code TB2020090203DB for $10 off!
🎁 Learn more here.

XP-Pen’s got a brand new Holiday Edition of their super-portable Artist 13.3 Pro display tablet! Compatible with Windows, Mac OS X, Photoshop, Illustrator, and more. Includes shortcuts stickers pack to optimize your workflow, free sketch downloads, battery-free stylus, pen holder, drawing glove, and other exclusive goodies.   

Price Range: $$$$
🎁 
Check it out here.

XP-Pen’s Innovator Display tablet has a wheel that lets you zoom in/out of your canvas and adjust brush size in a flash. Create vivid, vibrant artwork with sharp details anywhere you want to go. Includes a batter-free stylus for hours of uninterrupted drawing.

Price Range: $$$$
🎁 Get it here.  

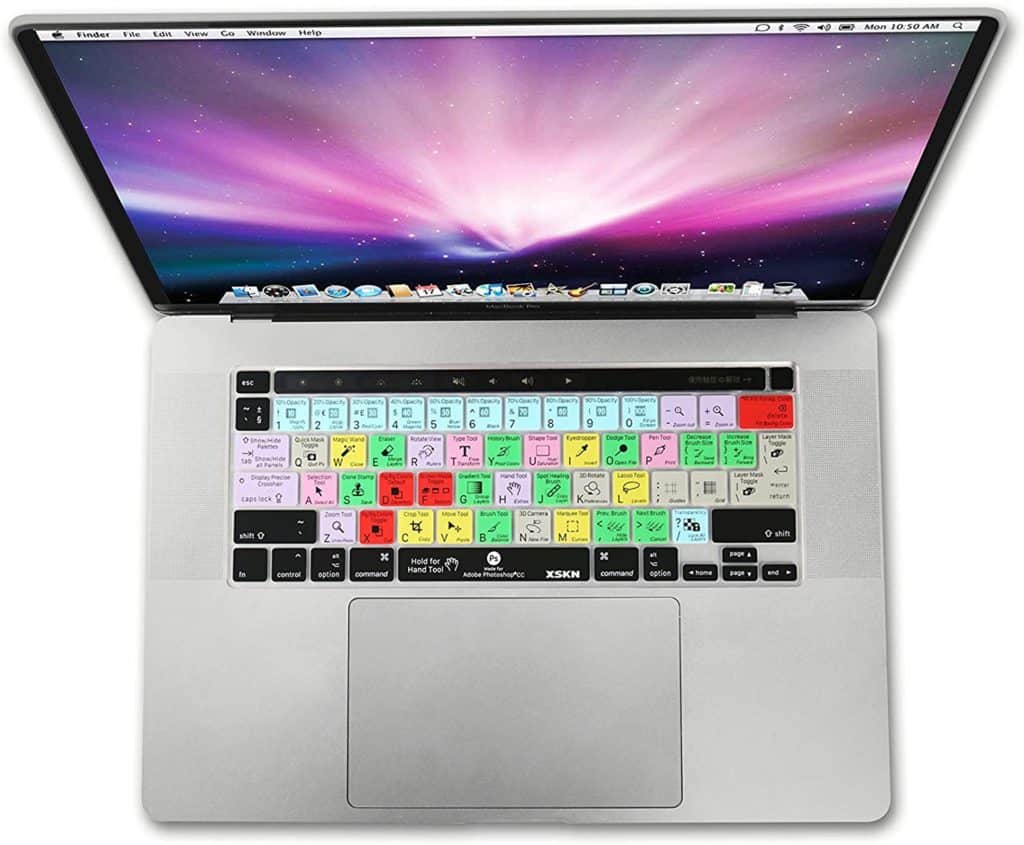
The easiest way to learn the many keyboard shortcuts for Adobe Photoshop CC! Soft, ultra-thin, and washable… protects your keyboard from your coffee too.  

Price Range: $
🎁 
Get it here.

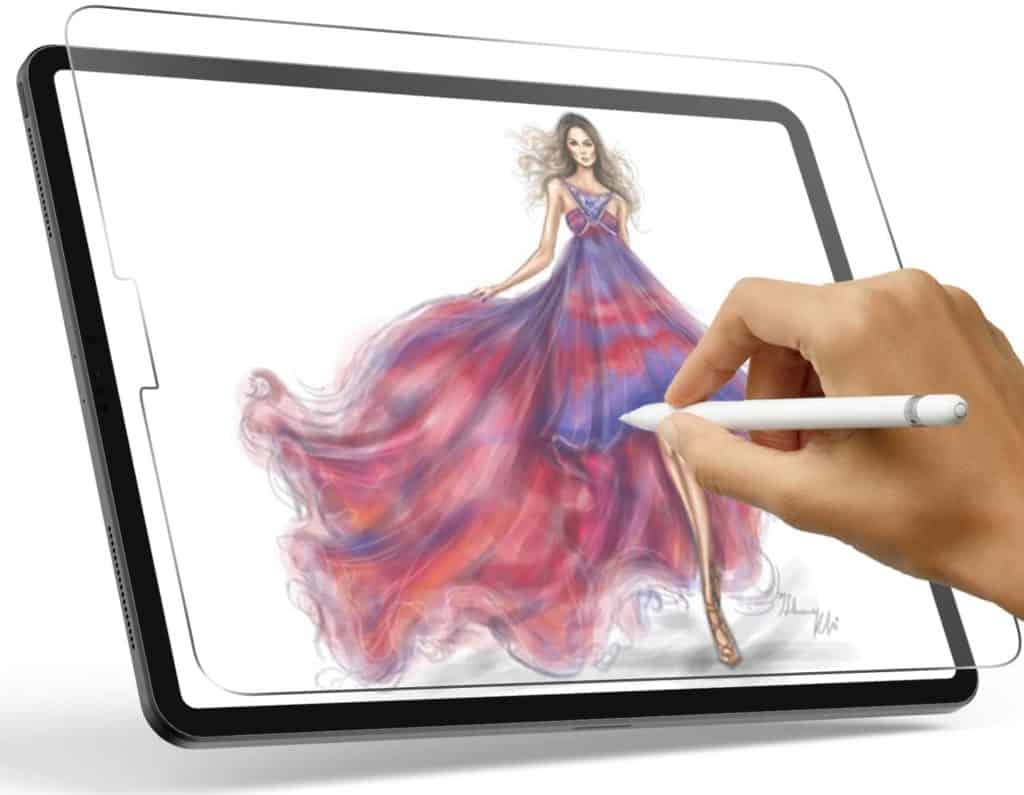
Raven, our Head of Student Happiness, loves this matte, paper-like screen film while drawing and painting on her iPad. “It feels like a sketchbook and offers your investment screen protection. It’s pretty great for digital artists that like a tactile feel!” 

Price Range: $
🎁 
Get it here.

Scan any object to find its color- a real life eyedropper tool to grab digital color values inspired directly by nature and your environment!  Great for artists who need to communicate color to colleagues and clients. 

Price Range: $$
🎁 
Get it here.

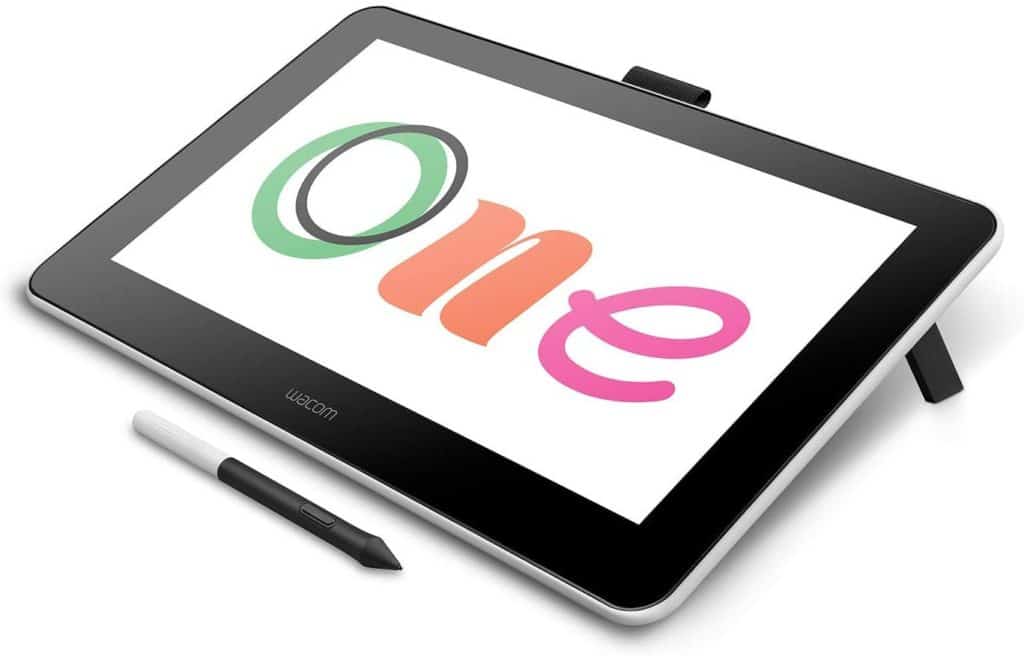
Perfect for kids and beginning artists, this graphics tablet replaces your mouse and turns your computer into a digital drawing canvas. Compatible with PC and Mac, use it with Photoshop, Manga Studio, Clip Studio Paint, and many other softwares. 

Price Range: $$
🎁 
Pick from small or medium here.

A step up from the Beginner Wacom One includes a screen display, giving you the freedom to work and paint from anywhere!  

Price Range: $$$$
🎁 
Get it here.

Love Photoshop, but hate the color picker? Us too! 

This handy Photoshop plug-in will change the way you color your digital paintings. It speeds up your workflow, letting you pick better colors, with less headache. If you often feel lost in a sea of color, Coolorus will help you narrow down and automatically pick the perfect colors to match your painting. 

Digital Painting Academy members: Check the Resources section for 40% off! 

Price Range: $
🎁 
Get it for Windows and Mac here.

This sleek case protects your Apple Pencil and other styluses, charger and cable, and earphones. 

Price Range: $
🎁 
Pick one up here.

The most powerful drawing and painting app for your iPad. Everything you need to create expressive sketches, rich paintings, gorgeous illustrations and beautiful animations. For professional and aspiring artists. 

Price Range: $
🎁 
Get it here.

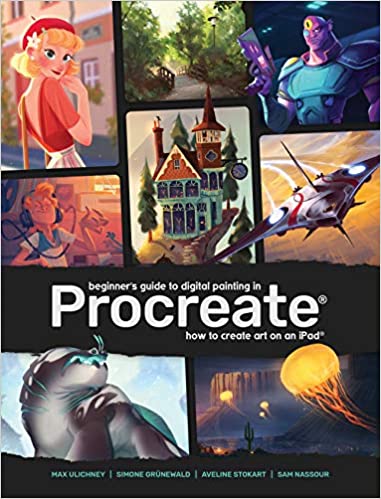
Perfect addition to Procreate! Bypass the trial-end-error learning the software with this comprehensive Beginner’s Guide to Procreate. Tutorials, quick tips, and inspiring examples will get you going fast. 

Price Range: $
🎁 
Get it here.

This tablet case protects your iPad from bumps and drops, and is also an adjustable magnetic stand with 8 angles to keep you comfortable while painting. Has a convenient charging-compatible elastic pocket for your Apple Pencil.

Price Range: $$
🎁 
Pick from 5 colors here.

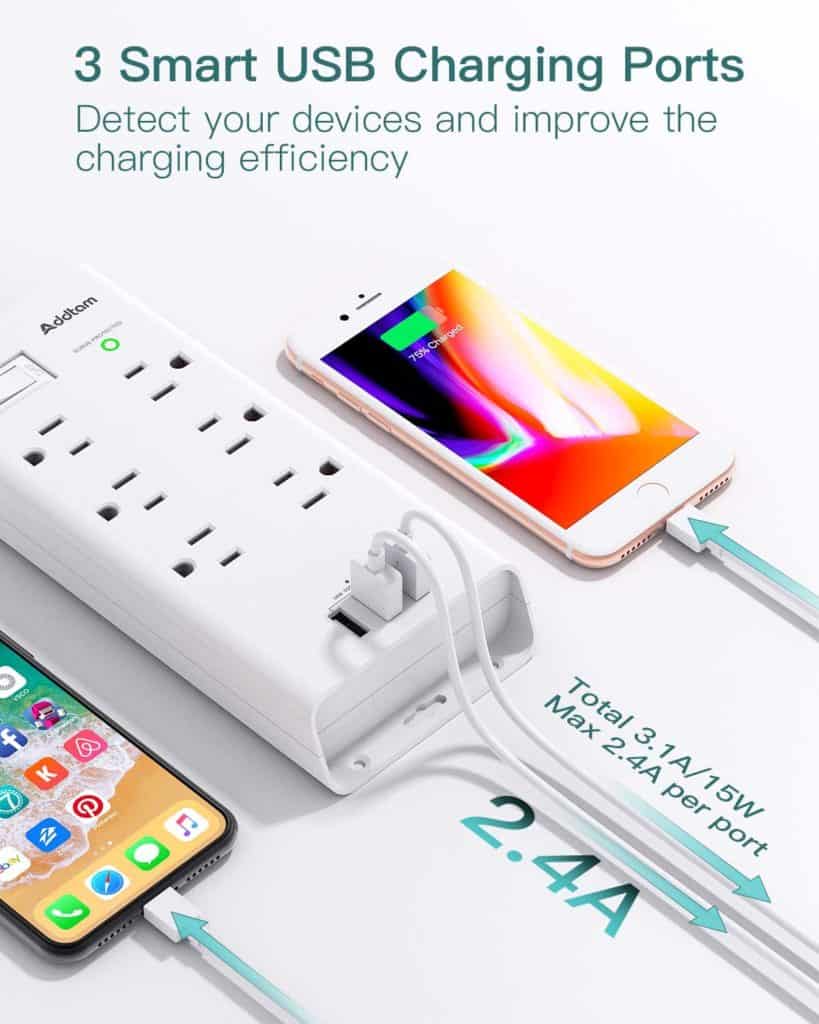
Having a good surge protector is essential to keeping your digital art devices safe. This one has an elegant braided cord, USB outlets for charging cords, and can be mounted to your wall or desk.

Price Range: $
🎁 
Get it here.

This super-cute soft silicone sleeve for your 2nd Gen Apple Pencil will surely make your favorite artist smile!  Charging-friendly and does not interfere with double-taps. 

Price Range: $
🎁 
Pick a color here.

This iPad case looks great, and comes in several colors. Holds and protects in style all of your USB cables, credit cards, adapters, styluses… and your iPad of course. 

Price Range: $
🎁 
Get it here.

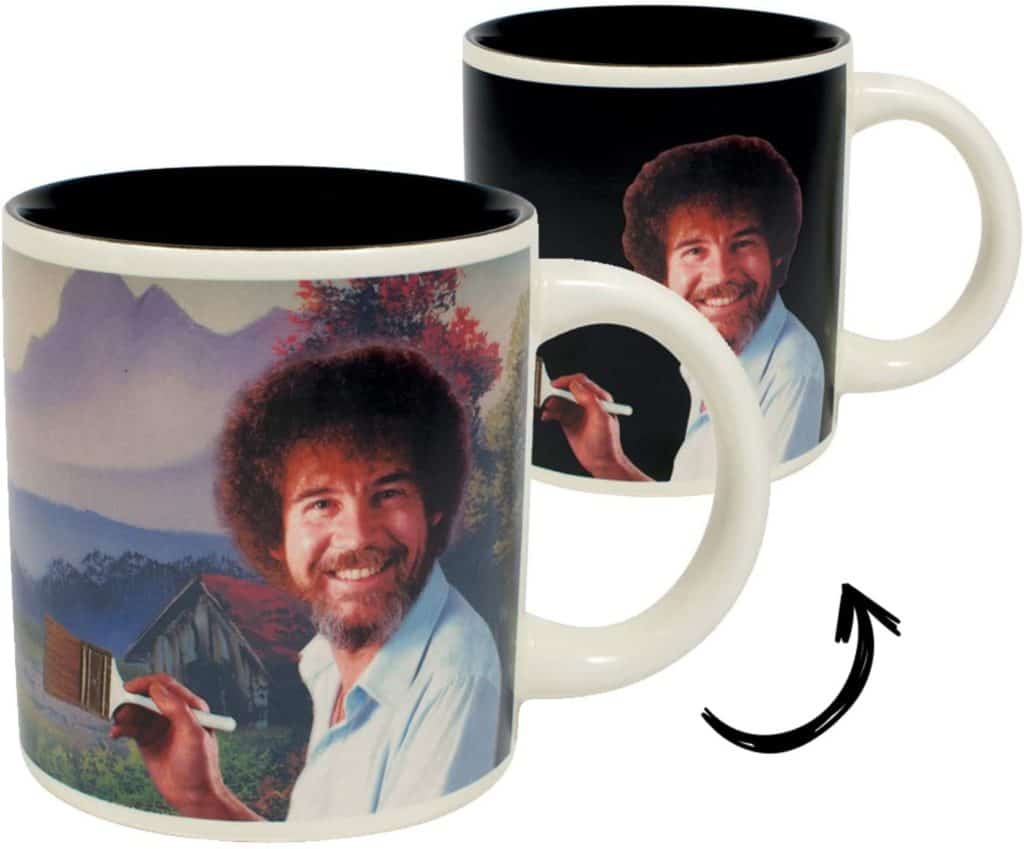
Add coffee or tea and a happy little scene appears. Comes in a fun, colorful gift box to stash in a stocking.  Who wouldn’t love it?  

Price Range: $
🎁 
Snag it here.

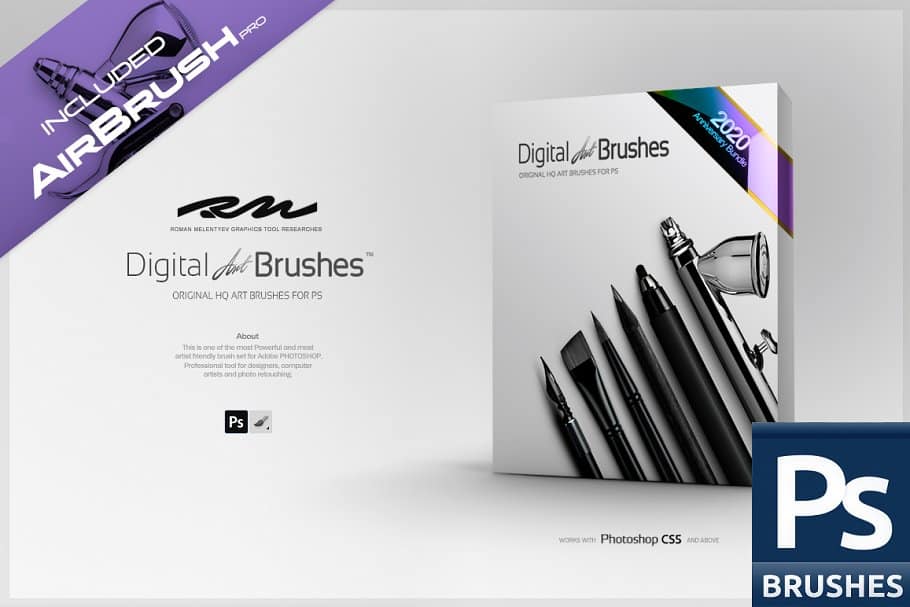
A popular set of brushes by Roman Melentyev, this is perfect if you’re looking for one brush set to cover pencils, ink, watercolor, oil, his 2020 Airbrush Pro set, and more!

Price Range: $$$
🎁 
Get it on CreativeMarket here.

Raven (Paintable’s Head of Student Happiness) always has a fun, colorful water bottle by her side. “Every artist I know is always dehydrated, so my friend and I have been a lot better off in that department by having one of these insulated water bottles available at our desk- no condensation, stays cold all day!” 

Price Range: $
🎁 
Lots of beautiful color gradients to choose from, here.

This changed the game for teammate Raven’s digital painting setup: monitor arms! “This opens up a lot of space on your desk and allows you to move the monitors to your pleasure- with great cable management!” Monitors can be placed in portrait or landscape position.

Price Range: $
🎁 
Get it here.

An extra-large, colorful mouse pad brightens a work area and helps keep devices in place. Also make mouse movements smoother and more accurate, reducing fatigue during long work sessions!  

Price Range: $
🎁 
Pick from 6 artistic patterns here.

Whether it’s for yourself or the artist in your life, this world-class library of premium masterclasses, workshops, hands-on exercises, and tools is your golden ticket to mastering the art of digital painting! The skills you learn will be yours for a lifetime.

Price Range: $
🎁 Get this gift here.

40 ‘MUST HAVE’ BRUSHES FOR PAINTING

Free Download:

Designed to Paint Incredible Portrait Details!

The post 25 Best Gifts for Digital Artists in 2020 appeared first on Paintable.

Over the past 7 weeks, our Illustration From Imagination students have worked so hard to push themselves out of their comfort zones and challenge their creative limits. 💪

For many of our students, it’s been a challenging ride, but that makes it so much more rewarding! They’ve massively leveled up their painting skills and learned practical skills like thumbnailing before starting a project and getting the composition just right, but they’ve also made some crucial mindset shifts to get past the fears of “not being good enough” and the resistance that sets in when they don’t know where to start. 😱

These are vital skills for all successful professional painters, and that’s why Illustration From Imagination immediately puts our graduates at an advantage when it comes to pursuing a career doing something they truly love and look forward to every single day.

A huge congratulations is in order! 🥳🥳

Every lesson in Illustration From Imagination is geared toward one final goal: to follow a brief set by a fictional client (Paintable Productions! 🖌) and create a killer portfolio piece: a beautiful movie poster.

Our students have loved working alongside the IFI community, getting valuable feedback from their peers (and from me), and seeing each others’ progress and final artwork…

But it wouldn’t be fair to keep all of their stunning paintings to ourselves, would it? 😉

Scroll down for a sample of the incredible final artworks.

👉 Check out the full set of uploaded final masterpieces here.

Want to see more? Check out the whole graduating class of June 2020 here. 👇

And if you want to learn more about what it’s like to participate in Illustration From Imagination, or sign up for the next round, here’s all the info.

The post Stunning Student Masterpieces – Illustration From Imagination Class of June 2020 appeared first on Paintable.

Cover image by David Belliveau

Creating a realistic, touchable-looking hairstyle to top off your digital portrait is absolutely within your reach!

Ever spent hours trying to get the hairstyle on your digital portrait to look realistic and touchable, but not knowing how to fix it? We’ve all been there! 
 

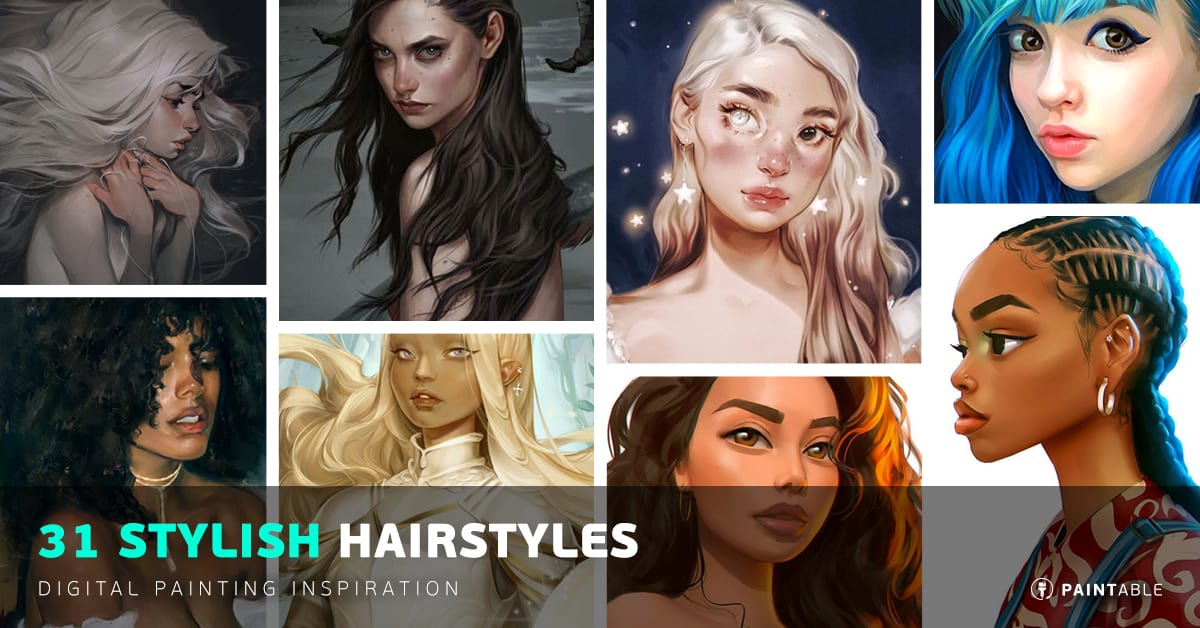
Learning to paint hair gets a lot easier (and faster) when you have a set of steps you can follow and practice. In this Ultimate Guide, I’ll walk you through the  process that I use to paint hairstyles on all of my digital portraits (except the bald ones 😁). 

After we’ve got hairstyles down, we’ll move into painting beards/stubble, eyebrows, and eyelashes. 

Follow along, and have fun!

Start with a Sketch of Your Hairstyle

Before we can begin painting our hairstyle, we need a sketch of it. And in order to create a sketch, we need an idea of what kind of hairstyle shapes we’re aiming for.

In this first video, I walk you through how to create your sketch, starting with finding a reference picture to inspire you, and then breaking down the shapes within the hairstyle.

(This video is part of the Sketching Hairstyles module within the Digital Painting Academy. That module is where I teach the 3 Pillars of a good haircut, which I mention in the first minute of this video.)

Here are the Pinterest boards I show in the video:
📌 Hairstyle With Style artworks
📌 Examples of hair blowing in the wind

👉 Want to skip the sketch of the head, and go straight to sketching the hairstyle? Try out the downloadable worksheets in this lesson.

Practice with Texture Brushes on a Lock of Hair

If you’re new to experimenting with texture brushes that can be used to create realistic locks of hair quickly, watch this video. 

You’ll see the different texture brushes I use, and how I use them with the mixer brush to blend colors and add details. Follow along, practicing on small locks of hair, and experimenting with different texture brushes to see which ones work best for your style.

After perfecting locks of hair, and getting used to different brushes and techniques, you can move on to your full hairstyle.

👉 You can download the brushes I use in the video for free here.

Render the Hair in Values

Once we have the basic shapes of the hairstyle defined in a sketch, we can begin rendering. For beginners, it’s often easier to learn to render using values  (grey-scale) before figuring out what colors will achieve the effect you’re looking for in your artwork.

Watch this video to get started rendering hair in values- the example here is a beard, but the techniques are applicable to hairstyles too. 

☝ This is an older video so bear with me here. 😁 The steps are still relevant and can help you up your value-rendering skills!

5 Steps to Perfect Hair From Imagination

Once you have a sketch of your hairstyle, and have practiced rendering locks of hair, it’s time to render your hairstyle in color- the key here is to add colors in layers.

This video walks you through how to create these layers, each one adding more depth and dimension to the hair:

  1. Start with a base of the darkest color.
  2. Design the shadows and light by adding the major areas that the light will hit the hair. We talk about the different tools to use in this step.
  3. Paint each lock of hair on the next layer, using a texture brush (examples given in the video).
  4. Add hue shifts to make the hair glow. I show you a few different hue shifts that you can experiment with- try a few to see what works best for the effect you’re after.
  5. Add details in just the right places using finer texture brushes and overlapping highlights. I give you some tips on how and where to do this to achieve the illusion that details are everywhere.

You can download the brushes that I use in this video for free here:

Beards, Eyebrows, and Eyelashes

Once you have some hairstyle painting basics down, you can move on to painting other types of hair. 

Stubble beards, 5 o’ clock shadows, eyebrows, and eyelashes are all similar to painting hairstyles, but take a slightly different technique and tool-set.

This video walks you through the steps to create a realistic stubble beard. Using the right brushes will make this really quick and easy- I show you which ones I use.

Creating eyebrows that don’t look “pasted on” was a bit mystifying until I discovered this technique to blend the skin into them properly. Take a look at this quick tutorial, and you may never paint brows the same way again!

And finally, eyelashes can make or break the eyes on your portrait. I used to just paint little lines for the lashes and wonder why they looked fake- there’s a super easy and quick way to improve the look of your lashes.

Watch this video to see how.

Great Examples of Beautiful Digitally Painted Hairstyles

You’ve covered a lot of ground in this Ultimate Guide to Painting Hair! Take it slow, focusing on improving just one step at a time, and you’ll be looking back at how far you’ve coming in no time!

For a bit of inspiration to help you set your own goals, check out these beautiful examples of creative hairstyles by amazing artists.

Keep practicing, and happy painting!

FREE CLASS + CHALLENGE

Learn To Paint Hairstyles With Style

Join the 7-day Challenge, get FREE access to 145+ minutes of masterclass video training on painting hair, and learn to paint your best hairstyle EVER!

Claim Your Free Spot!

The post Painting Realistic Hairstyles: The Ultimate Guide appeared first on Paintable.

Looking for a great way to start earning an income with your digital artwork?

When you want to be a professional illustrator, or even just get your art in front of more eyes, one of the smartest things you can do is build your own tribe. This is a group of fans who love to stay updated on your latest pieces, get a sneak peek at a work in progress, or simply say hello and thank you for inspiring them today! And if you’re looking to earn an income from your digital art, when you have this sort of community, earning becomes so much easier.

🎁 Keep reading till the end of this post for a great Ko-fi bonus we have for you!

Recently, I came across a FREE online platform that offers an easy, low-pressure way to start making an income from your art.
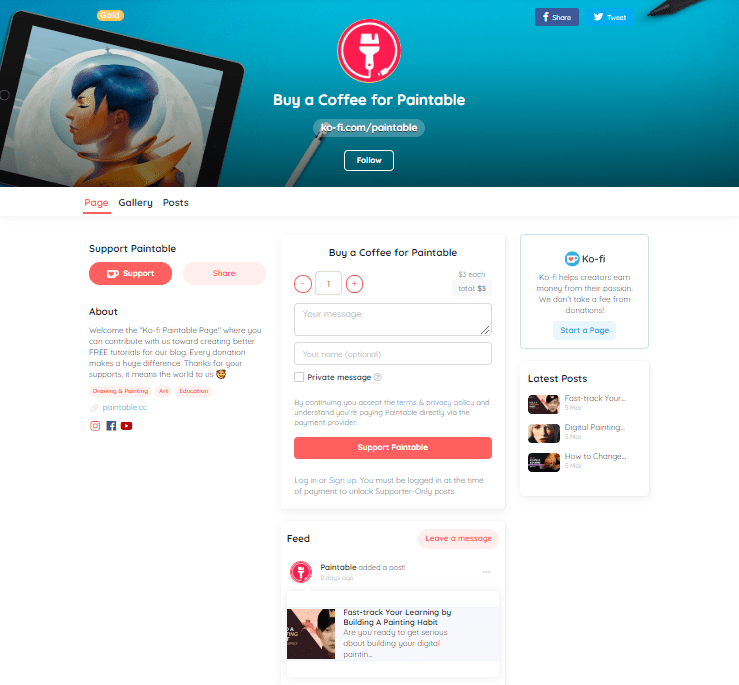
It’s called Ko-fi (like the beverage ☕, not the wrestler!). The concept is really simple, you showcase your art and invite fans to leave you a donation (roughly the price of a coffee) and message to support your work. It’s like a cross between a tip-jar and a simplified crowdfunding campaign.

How does Ko-fi work?

It took me about 10 minutes to get set up on Ko-fi, super easy. 

First you claim your page. If you’re looking to accept money, you can connect your page to PayPal, and then other payment methods if you like. Personalize your page with your best artwork, add a bio, a goal, and a video if you like.

Then you can create a gallery of your art (finished pieces, works in progress etc) and also add videos, blog posts and audio clips to help fans get to know you too.

Once it looks just how you want it, share your page link everywhere! 🎉

Your fans then visit your Ko-fi page, see what you’ve been up to, and can “buy you a coffee”, which means sending you a small contribution. 💲

You can also unlock paid Ko-fi Gold features like subscriptions (getting monthly support from your subscribers), commissions, and additional ways to personalize your page.

Here’s how the Paintable Ko-fi page is looking so far:

Why do artists love Ko-fi?

❤ When someone likes your work, they can donate a “coffee” (or a hot chocolate, a cup of tea, a beer, or even a cupcake!). Payments are made directly between fans and artists and no fees are taken by Ko-fi. 

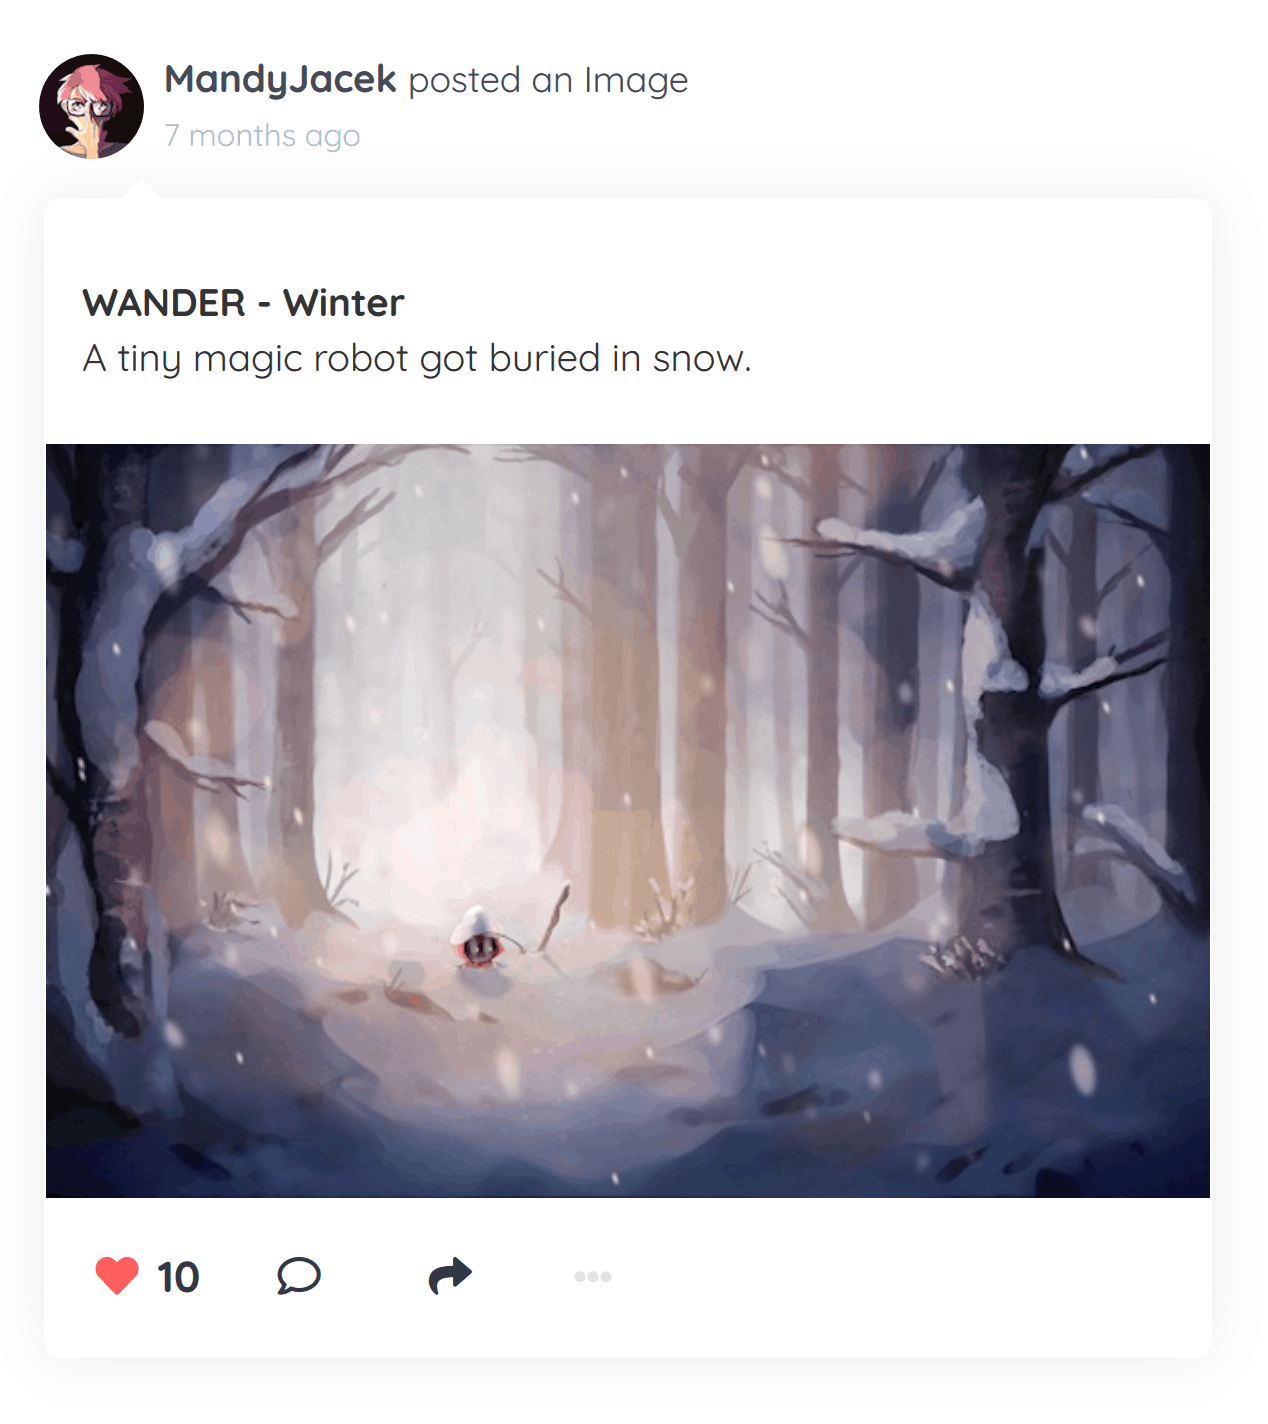
👋 One of the best things about Ko-fi is its community. From your page, you can write updates to your fans and followers, and if you don’t have any yet, start posting anyway — you might even get featured on their website (this is also great place to find inspiration and the perfect place to find new artists to follow)!

📈 Many creators use Ko-fi to set up fundraising goals so that fans can contribute to something specific, whether that’s buying a new tablet (maybe you have your eye on the new Wacom One), an iPad Pro, or a new desk for your home studio! 😍

😍 Every month, $1.2m is donated to artists through Ko-fi. These payments are being made directly between fans and artists, with no fees being taken by Ko-fi. Since Ko-fi launched, it’s helped creators receive over $23 million to fund their coffee-fueled painting sessions and creative passions. 😮

🥇 While it’s completely free to set up your profile, update your gallery, interact with fans and artists, and accept donations (with no cap or fees!), Ko-fi’s paid Gold membership adds great things, allowing artists to accept commissions and monthly donations, create private updates that can only be unlocked with a one-off or monthly donation (perfect for sneak peeks, tutorials, progress shots, and close-ups)!

Artists Killing It on Ko-fi!

Mandy Jacek, an illustrator and artist, uses Ko-fi to fund her own passion project: a comic called “WANDER”. The Ko-fi community helped her build a new office space at home, and upgrade her Cintiq tablet! She was also featured in Ko-fi’s blog, allowing her to reach even more new fans!

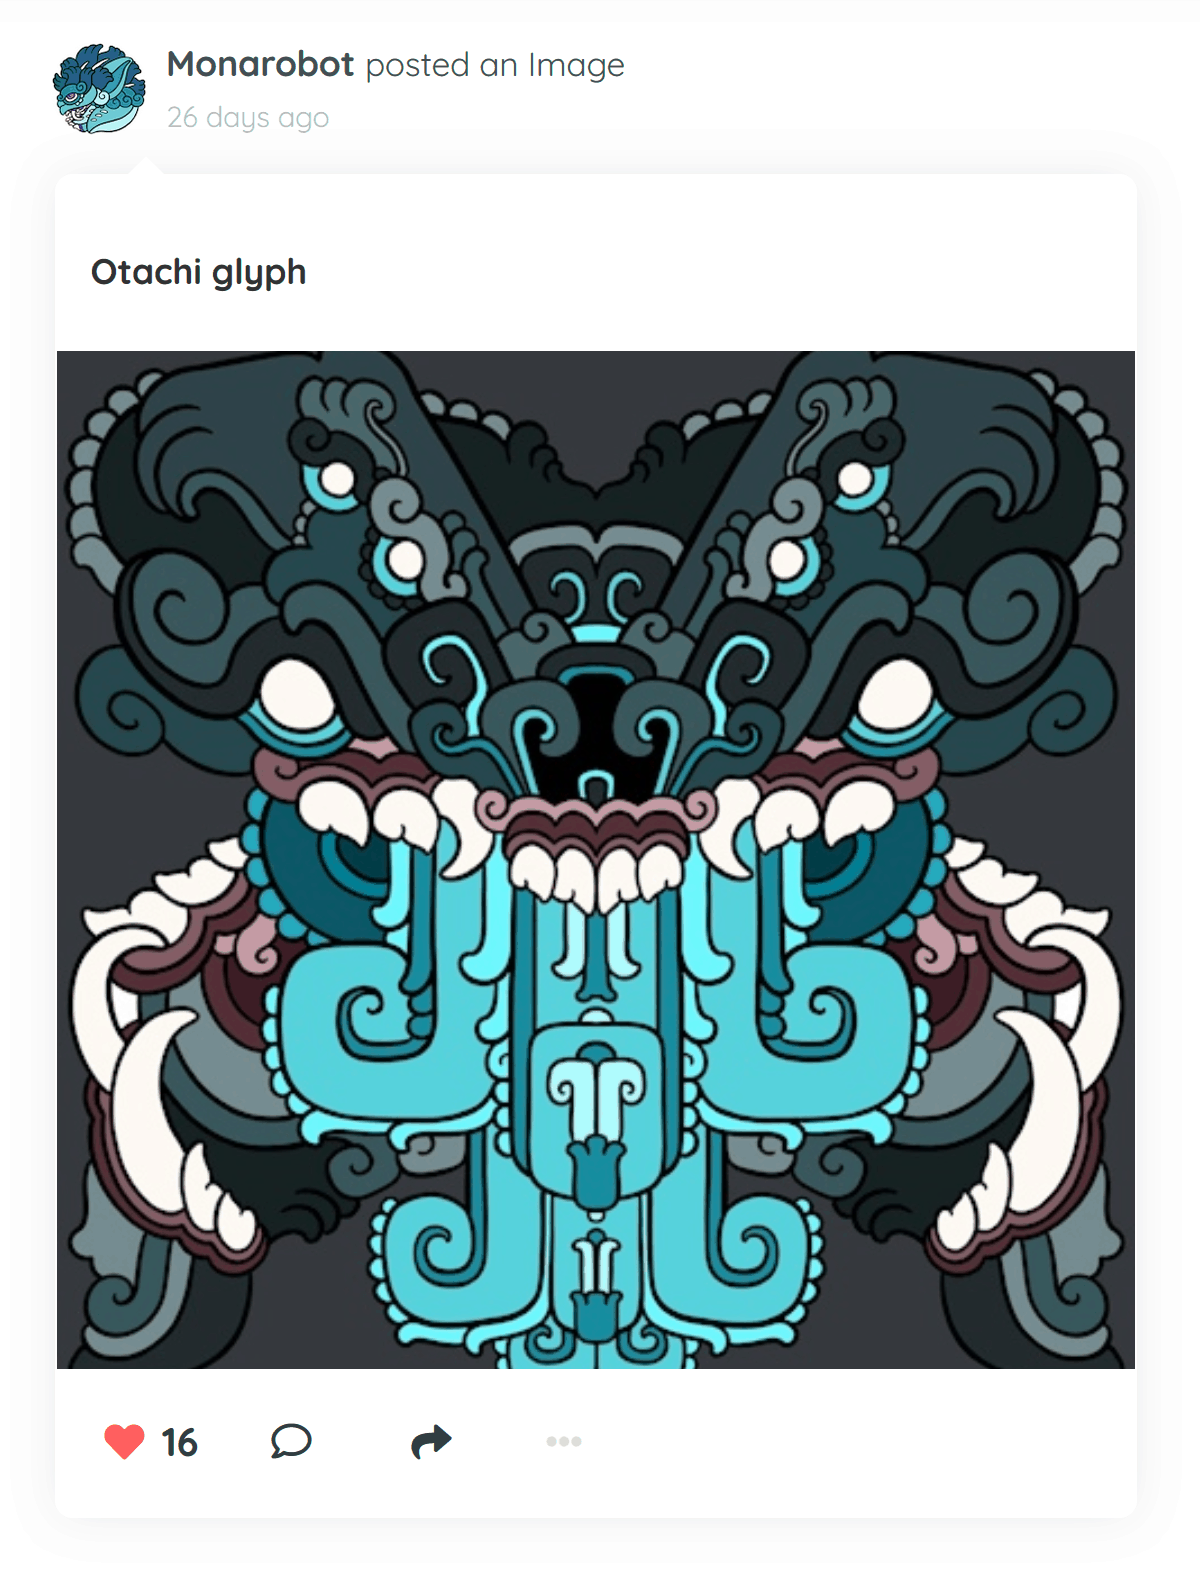
Mona (Monarobot), an artists from Chiapas Mexico, gives her Ko-fi fans exclusive early access to her new projects and behind-the-scenes content using Ko-fi Gold. She’s received over 5000 “snacks” from her fan so far! 😁

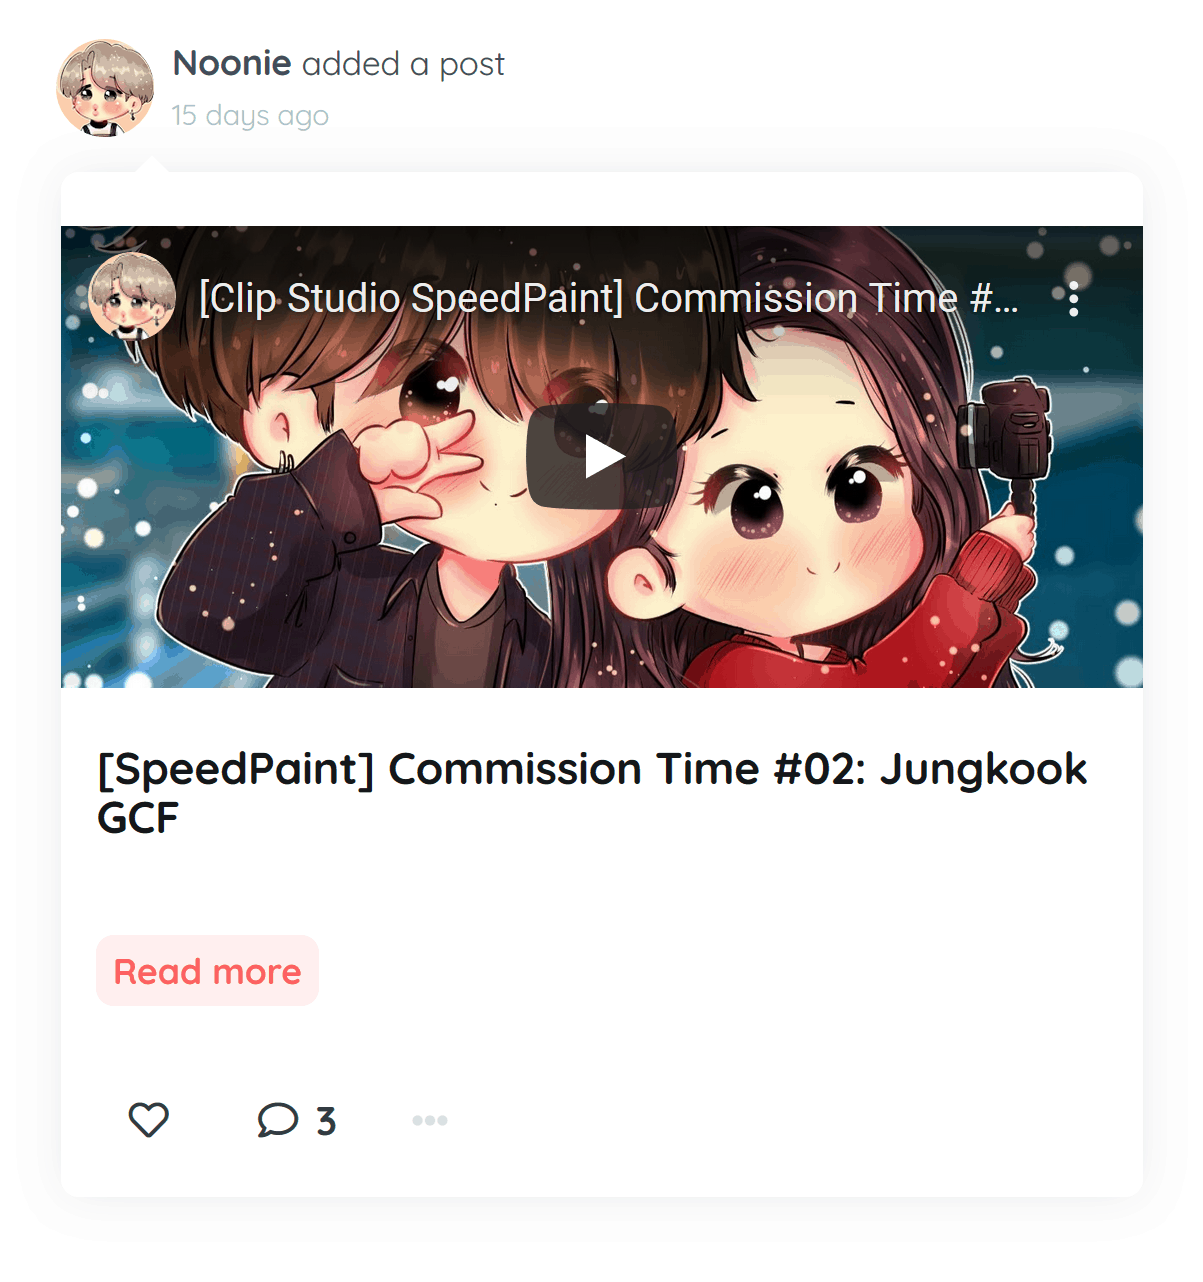
And Noonie, a Brazilian self-taught artist living in Japan, says: “Thanks to my Kofi supporters I can now work full-time on what I love most in my life: art. Thank you for making this possible, I will be eternally grateful ❤

Top tips for getting the most out of Ko-fi

If you’re thinking about setting up a Ko-fi profile and posting your art, but you’re not sure where to start, check out our top three tips for getting the most out of Ko-Fi.

1. Post often
Share your page, images and content regularly on socials to engage your fans! If you don’t have anything new to share, ask for opinions – like what subject they want to tackle next.

2.  Start small
Some artist and creators make a decent ‘4 figure’ monthly income on Ko-fi, but from what we’ve seen most are using it to fund creative expenses and make a side income. Ko-fi is a great opportunity to build your tribe and get to know and reward the people who are backing you.

3.  Be a fan
The more you give, the more you get. We’re all in this fun, creative ride together, and it’s so much better if you do it with friends! Don’t forget that Ko-fi is also a goldmine of creative inspiration, so if you see a piece of art that makes you smile or say, “Wow!”, consider buying the artist a coffee or leaving a friendly note on their page.

How to get started with Ko-fi

Want to see what it’s all about? Head on over to Ko-fi to claim your page and start sharing your art.

If you’re interested in getting the extras like changing up the coffee for something more “you”, or setting up commissions and unlocking all of the other perks of a Gold membership, you can check that out too.  Get 10% off annual Ko-fi Gold memberships for life! Just for being part of the Paintable community.).

Are you a member of the Digital Painting Academy? Jump inside the member’s area for a link to get 25% off of Ko-fi Gold!

The post A Good Dose of Ko-fi to Start Your Artistic Career appeared first on Paintable.

Are you ready to get serious about building your digital painting talent?

BE A BETTER ARTIST BY FEBRUARY 2023

 Join David and the Paintable Tribe community for 5 minutes every day in January to level up! 

We know that building any skill and developing any talent means putting in many hours of the activity. I’ve worked with some digital art students that will spend entire afternoons once or twice a month, working on their illustration, and become frustrated because they’re not progressing as quickly as they’d like.

It’s when they commit to a regular, consistent habit of developing their skills, that their progress really takes off!

That’s the key I’m sharing with you today:

When it comes to developing your digital painting skills, the frequency of your art sessions is more important than the amount of time you spend at each sitting! 

 And I have a tool for you to build your own habit! 🙌

Build a Painting Habit

In this video, I show you:

  • What exactly “building a digital painting habit” looks like
  • How much time is actually needed at each sitting for you to see progress
  • The 3 steps to take to build your own painting habit

I’ve also added a downloadable worksheet that I actually use when I get serious about building (or re-building) my own habits.

Watch the video below: 👇

👇 You can download this free PDF of the X Effect sheet right below, and use it for your first 30 habit-building days!

Give it a good 30 days to make your new schedule a solid habit. Then, leave a comment below and let me know if you’re having more fun, and seeing better progress in your skill development!

The post Fast-track Your Learning by Building A Painting Habit appeared first on Paintable.

Itching to know what it’s like to switch from a Wacom tablet with Photoshop to an iPad Pro with Procreate?

I’m shaking things up in a big way today! 

In all of my tutorials and course modules so far, I’ve been teaching you using Photoshop on a Wacom tablet with a MacBook.  I’ve been dying to try out Procreate on an iPad Pro, so I can give you tips and tricks using those tools.  And today, I’m bringing you along as I get started!

In this video, I unbox my new 12.9 inch iPad Pro, and give you my first impression of the Procreate app. 

While working on the same illustration using the same process on both setups, I give you my thoughts on:

  • What it’s like to work on an iPad after years of using a Wacom tablet and MacBook.
  • What are the big differences between the 2 hardware setups
  • Comparing the feel of the Wacom pen vs the Apple pen
  • The plusses and minuses I’ve experienced using Photoshop vs Procreate 
  • The biggest difficulties I’ve seen as a professional artist working on the iPad
  • Is the Procreate app powerful enough for professional work as an illustrator?

Photoshop vs Procreate - Digital Painting - Paintable

Let’s get into it!

If you’re getting started with Procreate, rather than starting with a portrait like I did, I recommend starting with a smaller illustration like in the Ultimate Beginners Guide here

And if you’d like to set up your workspace like mine, here’s what I’m using:

I’d love to hear your first impressions of Procreate!  What did you find most difficult to get used to, and what are your favorite tips for using it?  Put it in the comments below!

I’ve also prepared a gift for you – here it is:

40 ‘MUST HAVE’ BRUSHES FOR PAINTING

Free Download:

Designed to Paint Incredible Portrait Details!

The post Photoshop vs Procreate for Digital Painting appeared first on Paintable.

Fancy yourself an artist? Here’s the ultimate step-by-step guide to becoming a 21st Century painter!

Do you want to be a digital artist, but don’t know where to start? Perhaps you’ve done a Google search before, but felt overwhelmed by all the information, or intimidated by what the authors assumed you already know.

I’ve realized that there’s not enough beginner-friendly material out there for people who want to try digital painting. That’s why I’ve put together this comprehensive guide to explain everything you need to know to get started. From the tools, software, process, and features–this guide is everything you need to jumpstart your new hobby (or career) ASAP.

Note: Some of the links in this post are affiliate links. That means if you buy something, I get a small commission at no extra cost to you, to help support the blog and allows me to continue to make free content. Thanks for your support! 🙂

Also, I’ve created 28-Portrait Brushes that might help you paint better – you may want to opt-in and get them. They are free!

40 ‘MUST HAVE’ BRUSHES FOR PAINTING

Free Download:

Designed to Paint Incredible Portrait Details!

What Is Digital Painting?

So you might already be familiar with traditional media, such as watercolor, oils, or acrylic – and now you’re wondering.. “what is digital painting?”

Digital painting is a new medium that lets us create beautiful artwork, without the messiness of painting with inks or oils. It still requires many of the same skills and techniques as traditional painting (no, you can’t just create art at the click of a button… yet), but it’s also easier in many ways.

Instead of painting on canvas or paper, digital painting allows you to paint directly onto a computer, which has a number of amazing advantages:

  • It’s a lot less messy, and you can do it in even the smallest spaces – as long as you’ve got space to set up your tablet (and possibly a computer), you’re good to go!
  • It’s a lot faster, as you don’t need to wait for paints to dry
  • It will allow you to work faster and more creatively – you can use powerful digital tools like layers to unlock entirely new ways of working

The only things you need to get started with digital painting are a graphics tablet, and painting software of your choice.

Don’t worry if you’re unsure where to begin – in this guide I’ll walk you through it all step-by-step.

Let’s begin…

What tools do I need to get started with digital painting?

To get started with digital painting, you will need just two things: a tablet, and some painting software.

Choosing Your Hardware

There are three main categories of graphic tablets:

Graphic Tablet

Display Tablet

“All-In-One” Tablet

Graphic Tablets

These are the cheapest models, and what most artists (myself included) start out with.

They generally have just two components: a touch-pad, and a stylus (a digital pen), though fancier models will also have a number of buttons and dials along the side. Because these tablets don’t have screens, you will need a laptop or computer to plug them into (usually via a USB cable)

Pros:

Cons:

Most popular models:

Pro-Tip: I would recommend you get a tablet that has a drawing area of at least 6″ x 3.7″. You’ll need this to create fluid, dynamic strokes.

Display Tablets

Got a little extra budget? Consider investing in a display tablet!

Display tablets function like graphic tablets, but with a built-in monitor. You can draw directly onto a screen, which feels more intuitive (especially when you’re used to painting on paper or canvas).

Pros:

Cons:

Most popular models:

“All-In-One” Tablets

These include popular tablets like the iPad Pro or Microsoft Surface Pro.

The big advantage is that you won’t need an extra laptop or computer to plug your tablet into – these are essentially a tablet and computer 2-in-1. This makes them very portable – you can take them with you wherever you go. The downside is that they are more expensive, and you have a very limited selection of software available to you.

Important: If you choose to use an Apple iPad, you will also need a stylus with pressure sensitivity. The Apple Pencil has built in pressure sensitivity, but it only works with the iPad Pro – if you are using a regular iPad there are options like the Adonit Pixel Stylus.

Pros:

Cons:

Most popular models:

Digital Painting Software

There are a lot of different programs available for digital painting, so to make your life easier I would suggest you get one of these three:

Adobe Photoshop

Krita

Procreate

If you’re using an iPad Pro, use Procreate. For all other devices, I’d recommend Adobe Photoshop or Krita.

Adobe Photoshop

Price: $19.99/month (on the Creative Cloud “Photography” Plan)

If you want to get serious about digital painting, I highly recommend Adobe Photoshop. It’s the most powerful software available for painting, and because it’s become the industry standard you’ll find the most training & lessons on it.

> Click HERE For a Free 7-Day Trial

Krita

Price: Free!

Krita is a free and open-source alternative to Adobe Photoshop. It’s not quite as powerful, though it’s certainly good enough to get started if you’re on a limited budget. Just be aware that you won’t find as much training on it online, and if you want to one day work professionally in an in-house studio or agency, you may need to eventually switch to Adobe Photoshop.

> Click HERE to download for free

Procreate

Price: $9.99 (one-time payment)

Procreate has been taking the art world by storm in the last few years. It’s very light-weight and easy to use, and while it’s lacking some of Photoshops features, more are being added to it all the time. Unfortunately it’s currently only available for iPad.

> Click HERE to Get Procreate

Other Software

While I recommend you stick to one of the 3 programs above, there are other options available to you. Other popular painting programs include:

Pro-Tip: At the end of the day, picking your software is a matter of preference. With enough practice you’ll be able to create professional looking artwork in any software. Based on my experiences I would recommend you pick one of 3 programs I listed above, but if you’d prefer to use another app, then go for it!

Overwhelmed? Here’s What I’d Recommend…

It can be easy to get overwhelmed with the amount of choices available, and get lost down a rabbit hole of trying to find the perfect set up.

My advice to you is this: don’t overcomplicate it! At the end of the day, the tools don’t make an artist, and you won’t notice a huge difference between entry-level and professional-level tablets as a beginner.

Start simple! The Wacom Intuos is an inexpensive and very reliable tablet (I still use it to this day!). Pair it with Adobe Photoshop – or Krita if you’re on a budget – and you’re good to go!

Understanding Your Tools & Software

In this video, I’m going to walk you through the software interface, so you know how all of the tools work!

I’ll be using Adobe Photoshop, but you can follow along in most software – many of the tools look & behave similarly.

Note: I’ve summarised some of the most important concepts from the video, but make sure to watch the video above as there are many more lessons in it!

Canvas and Documents

The very first step of digital painting is to create a new document.
 
In Adobe Photoshop, you can do this by going to File > New Document, or by using the keyboard shortcut CTRL/CMD + N
 
Depending on your version of Photoshop, you’ll see a window with the following options:

The most important settings to remember are:
 
  • Width & Height: Use this to set the size of your canvas, in either Centimetres or Inches
  • Resolution: If you’re planning to print your artwork, use 300 Pixels/Inch. If you’re not planning to print it, use 72 Pixels/Inch – this will keep your file sizes smaller and make your computer run faster
  • Color Mode: Always start in RGB. If you want to print your artwork, you can switch this to CMYK later on.

The Software Interface

The 3 most important part of the Photoshop software interface to remember are:

  1. The Toolboxthis contains all of the tools you’ll need, like the brush, eraser, selection tools, etc.
  2. The Options Baras you select tools in the toolbox, you’ll see that the bar at the top of the window changes, giving you different options for each tool
  3. Panelsyou can mix and match the panels that you find most useful for your own workflow. For now, I recommend you start with the Brushes, Layers, and Color panels

Keyboard Shortcuts

To speed up your workflow, you should start to get familiar with using keyboard shortcuts.

Here are some of the most important Photoshop shortcuts to remember:

  • B – Select the Brush Tool
  • E – Select the Eraser Tool
  • Z – Select the Zoom Tool
  • M – Select the Marquee Tool
  • Ctrl/Cmd + T – Use the Free-Transform Tool

When you have the Brush Tool (shortcut: B) selected, there are a number of shortcuts you can access by holding the following keys:

  • Spacebar– Temporarily select Move Tool
  • Spacebar + CMD/CTRL– Temporarily select Zoom Tool
  • CMD/CTRL  – Temporarily select Eyedropper Tool

You can download a list of other useful Photoshop keyboard shortcuts here.

Making Your First Marks:

Now that you understand the interface, let’s take a look at the most important tools & concepts…

Note: I’ve summarised some of the most important concepts from the video, but make sure to watch the video above as there are many more lessons in it!

Layers

Layers can be one of the most useful features of digital painting, if you know how to use them.

By using layers, you can keep different elements of your painting separate. Whether it’s an object, a body part, a highlight or a shadow–painting them on different layers will give you the ability to tweak each element without risking the rest of your work.

The most important thing to remember about layers is this: the order that layers are listed in your Layers panel is the order they will show up on your canvas. Layers that are higher up will be placed on top of layers underneath them. You can drag and drop layers to change their order in an instant.

More resources on using layers:

Brushes & Erasers

As in traditional media, brushes & erasers are tools used to add and remove color, respectively.

The varieties of brushes used in digital painting are unlimited. In Photoshop, a unique brush stroke can be created by simply changing the brush tip, size, softness, shape, and even the pressure applied. If you miss the texture of traditional media, you can even use brushes that are designed to look like oil or watercolor!

As for erasers, they can be configured in the same way as brushes in terms of size, shape, and softness. The only difference is that they remove color instead of adding them.

More resources on using brushes:

Blending

Blending colors is essential in creating a smooth, three-dimensional effect.

There are many ways to create a blended effect in Photoshop: soft edge brush, smudge tool, and mixer brush being the most common tools. Of course, you should choose your technique based on the effect you are trying to achieve. We suggest you start by trying out various blending tools to see for yourself what fits your process and personal painting style.

To learn more about blending, take a look at this guide we’ve put together for you!

Putting It All Together: Painting Your First Masterpiece!

If you’ve made it this far, then congrats! You’re ready to start painting your very first digital masterpiece:

In this step-by-step video, you’ll learn all of the most important digital painting techniques, and use them to create a prickly painting of your own! Don’t forget to download the free exercise sheet above so you can follow along yourself.

Next Steps

Congratulations, you’ve taken the first (and most difficult) step as an artist… getting started!

I hope you’ve enjoyed this free guide, and I hope you’re feeling fired up about digital painting! If you’d like to keep learning and improving, take a look at the following resources:

  1. Browse our blog for more free tutorials, guides, and inspiration
  2. Or if you’d like to really take your paintings to the next level, check out the Digital Painting Academy!

The Academy is your one-stop-shop for mastering digital painting – full of step-by-step lessons, resources, an amazing community, and even the ability to get help and support from a seasoned instructor.

It’s the most affordable alternative to Art School – so come take a look!

Happy painting!

40 ‘MUST HAVE’ BRUSHES FOR PAINTING

Free Download:

Designed to Paint Incredible Portrait Details!

The post Digital Painting: The Ultimate Beginner’s Guide appeared first on Paintable.

Painting from imagination can be tough… where are you meant to put the highlights? And what about the shadows?

The key is understanding how different types of light work.

Luckily, there’s an 8-step “recipe” to painting light from imagination – which I cover in-depth in my program, Illustration From Imagination. And today, I wanted to give you a sneak-peak of one of these lessons!

Today’s lesson is a COMPLETE walkthrough of my rendering process, in which I show you:

  • How to break complex shapes down so you can paint even the most difficult objects,
  • How to add different light sources completely from imagination,
  • Exactly where to place the most important highlights, shadows, and details in every painting,

And much more:

You can download the exercise files mentioned in the video for both Photoshop and other tools right here.  Enjoy!

40 ‘MUST HAVE’ BRUSHES FOR PAINTING

Free Download:

Designed to Paint Incredible Portrait Details!

The post How to Paint Anything: The ULTIMATE Guide to Rendering appeared first on Paintable.

They say that eyes are windows to the soul…

From our hidden thoughts to our deepest emotions, eyes can tell us an awful lot about someone. If we wish to paint a truly expressive portrait, it’s vital to learn how to paint realistic eyes.

Let’s jump right in!

STEP 1: Sketch An Outline

1. Begin your rough outline on a midtone background

How to Paint Realistic Eyes, Step 01

Using a relatively large brush, begin to sketch the outline of your eye. If you aren’t 100% familiar with eyes, I HIGHLY recommend you use a reference photo.. it’s the best way to learn!

You can use any brush you want, but make sure you don’t go into too many details. You are just building a basic ‘​roadmap’ for your painting.

Tip: When sketching, going into too much detail will slow you down and make your life more difficult. Avoid the temptation by selecting slightly larger brushes.

(RELATED: Why You Should Start Your Painting With a Midtone Background)​

2. Develop your sketch, and don’t be afraid to erase and re-draw lines

How to Paint Realistic Eyes, Step 02

It’s actually fairly difficult to sketch on a tablet. Don’t get frustrated! The beauty of digital painting is that you can delete and re-draw your lines as many times as you need to.

Remember: This is not meant to be polished linework! It is simply a roadmap for your painting. I’ll show you how to paint realistic eyes in time, for now keep it sketchy and loose.

STEP 2: Rendering The Eye

The ‘Brush and Cut’ Method

Before we begin rendering in detail, it is important you understand one of the most common techniques in digital painting. I like it call it the Brush and Cut method.

The basic principle is this:

  1. Create a new layer
  2. Brush on a shape (usually with a soft brush)
  3. Cut one or more edges out of this shape (usually with a hard eraser)

Lets have a look at an example:

1. Merge the sketch and background, then create a new layer

How to Paint Realistic Eyes, Step 03

The first step is to merge your sketch with your background. I personally like to use Ctrl/Command+Alt+Shift+E to merge everything to a new layer on top. This way you still have your sketch as a separate layer, in case you need to go back to it in the future.

Then, create a new layer by pressing Ctrl/Command+Shift+N.

2. Add shading to the eyeball with a soft, round brush

How to Paint Realistic Eyes, Step 04

On the new layer, begin to add some shading around the outside of the eyeball. Do this by painting just outside of the lines of the eye.

3. ‘Cut’ away the values outside of the eyeball with a hard-edged eraser

How to Paint Realistic Eyes, Step 05

Erase everything that spills outside of the outlines of the eye.

As you can see, the Brush and Cut method allows us to very easily create areas of values that have a soft, gradient edge on one side, and a hard-cut edge on the other.

This has allowed us to paint the basic shading around the outside of the eye, giving it a 3D look.

Note how rough everything is still looking at this stage. That’s totally ok, don’t get frustrated!

Remember: The beauty of this method is that ​each new element you create is on a new layer. You can keep playing around with it, brushing and cutting the shape without fear of wrecking anything you’ve already painted.

And if everything is looking too light or dark, you can play around with the layer’s Opacity in the ‘Layers’ panel.

4. Use variations of this method to continue rendering

You don’t have to Brush and Cut with a soft brush and hard eraser. You could just as well brush in areas of values with a harder brush, then fade out the edges with a softer brush.

5. Use the Marquee Tool to Paint a Perfectly Circular Iris

You don’t have to paint everything by hand. Often you will get better results by using the other tools at your disposal, such as the Elliptical Marquee Tool (keyboard shortcut: M).

I first erased the iris from my sketch. I then made a selection with the Elliptical Marquee Tool on a new layer, and filled it with light gray. As it was on a new layer I could use the Free Transform Tool (Ctrl/Command+T) to reposition it.

6. Tip: Blending With the Smudge Tool

How to Paint Realistic Eyes, Step 09

One very useful tool for blending is the Smudge tool. I prepared a tool preset for you which contains my favourite Smudge settings. You can find it in the downloadable brush files.

> Click Here to Download Tutorial Brushes

You can use the Smudge tool to blend lines in your painting, and smoothen out hard edges.

(Related4 Essential Techniques for Blending in Photoshop)

7. Keep Rendering the eye!

How to Paint Realistic Eyes, Step 07

Keep painting values bit by bit. Make sure to start with the big areas of high and low values, before zooming in and painting in the little details with a smaller brush.

Here is a tip you might find useful if you find yourself getting caught up in the details too soon.

Besides some of the techniques mentioned above, there isn’t an exact ‘science’ to rendering. It is largely a matter of taking the time to study your reference image . Make sure to keep rendering even if you’re feeling frustrated. And of course, practice, practice, practice!

TIP: To see my full rendering process, and learn about many more tips and techniques (such as using Liquify to fix proportions or Adjustment Layers to boost contrast) make sure to watch the full video.

STEP 3: Adding Eye Details

1. Adding Details in the Highlights

How to Paint Realistic Eyes, Step 11

You don’t need to go adding intricate details to every square inch (or pixel) of your painting. In fact, sometimes less is more.

Details in key areas (ie. extreme highlights and shadows) will be much more noticable. Focus on these, and you will create the illusion that the whole piece is intricately detailed.

I personally like to start by using a textured brush to add highlights.

2. …Then the Shadows

How to Paint Realistic Eyes, Step 12

Still using a textured brush, I will then begin to add some shadow details. I paint everything on a new layer, so that I can go back and erase it, using the Brush and Cut method to blend it into the painting.

3. Adding Details to the Iris

How to Paint Realistic Eyes, Step 13

Use a small, light brush to paint in lines around the iris. Then, go over and blend them with the smudge tool to make sure the lines aren’t too sharp.

4. Penciling in the Eyelashes

How to Paint Realistic Eyes, Step 14

On a new layer, begin with a big brush, to paint in the basic shape the eyelashes will occupy. Then drop the opacity, and paint individual eyelashes over this shape with a fine brush.

5. Pro-Tip: Adding the Eyelash Highlights

How to Paint Realistic Eyes, Step 16

Here’s a tip for creating extra realism in the eyelashes:

As you’ve painted the eyelashes on a new layer, you can now Ctrl/Command+Click on the layer’s Thumbnail in the Layer icon to make a selection of the eyelashes.

Hide the selection (Cmd/Ctrl+H), and select a light, soft brush. Brush over the selected area to create highlights for your eyelashes.

Then, go to Edit > Transform > Skew and skew the highlights slightly towards one side. This will create the illusion of a few highlighted eyelashes poking out in between the rest.

6. Painting Details in the Eyebrows

How to Paint Realistic Eyes, Step 10

The trick to painting hair is to think of it as a geometric shape, rather than a collection of thousands of individual hairs. Paint the overall shape first, then add individual hairs in key areas (highlights + shadows).

(RelatedHow to Paint Hair Quickly and Effectively)

STEP 4: Post-Production

1. Add the Glossy Highlights

How to Paint Realistic Eyes, Step 13

OK so this one’s technically more of a detail than post-production work. But it makes such a big difference that I wanted to save it till last.

Depending on your light source, you will want to paint in a few reflection spots on your eye. These will give the eye a glossy, wet look and really make them POP.

2. Tweak the Brightness/Contrast

How to Paint Realistic Eyes, Step 14

Add a Brightness/Contrast adjustment layer to your painting by clicking the Adjustment Layer icon in the Layers panel.

Make a few small tweaks to up the contrast and give your painting a bit more of a ‘punch’. Be careful not to overdo it, however!​

3. Add Some Noise

How to Paint Realistic Eyes, Step 15

This step is optional, but I find that especially when painting skin, adding a bit of noise can go a long way in making the details pop.

To do this, merge your painting to a new layer (Ctrl/Cmd+Alt+Shift+E)​, then go to Filter > Add Noise.

Depending on the size of your canvas you will need to play around with the options. Make sure to add a touch, don’t overdo it. Often less is more!

4. Paint the Shadow Casted by the Upper Eyelid

How to Paint Realistic Eyes, Step 16

Using the Brush and Cut method, add a highlight to the top of the eyeball, and erase away everything that spills over the top eyelid.

5. Add Final Touches With the Sharpen Tool

How to Paint Realistic Eyes, Step 17

The Sharpen Tool is perfect to add little spots of increased details throughout key areas of your paintings. Use it in moderation and don’t overdo it (stop me if you’ve heard this before!).

I would recommend using the Sharpen tool on a new layer, by selecting “Sample All Layer’s” in the toolbar at the top. This way all changes are created to the top layer, and you can actually go back and erase parts of them using the Brush and Cut method.

Final Step: Admire Your Perfect Pair of Eyes!

As creatives we often have a tendency to be unnecessarily hard on ourselves. Sit back and enjoy the fruit of your labor! And remember, the key to learning digital painting is to practice, practice, practice.

If you’d like feedback on your work just post it in our Paintable Facebook Group!

Learn to Paint Your Own

 Eye-Catching

 Masterpiece!

40 ‘MUST HAVE’ BRUSHES FOR PAINTING

Free Download:

Designed to Paint Incredible Portrait Details!

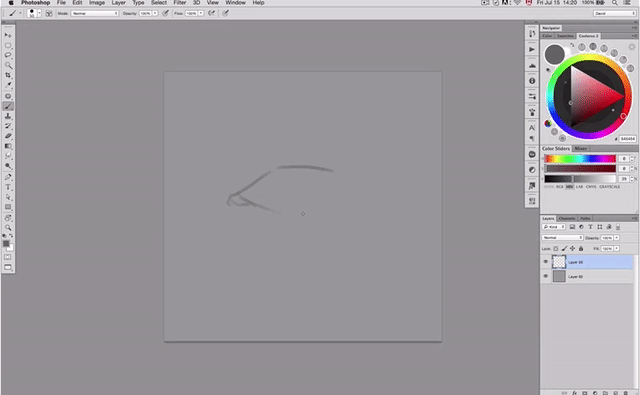
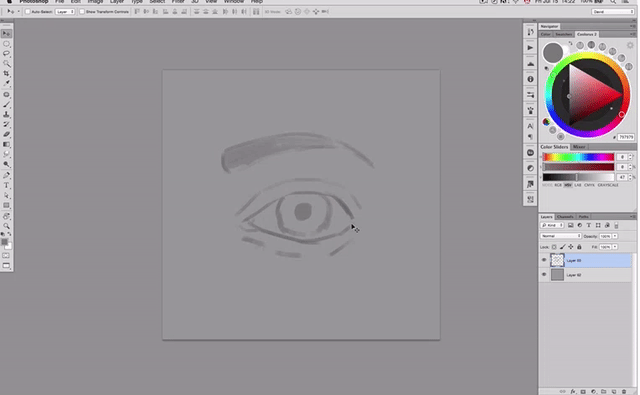
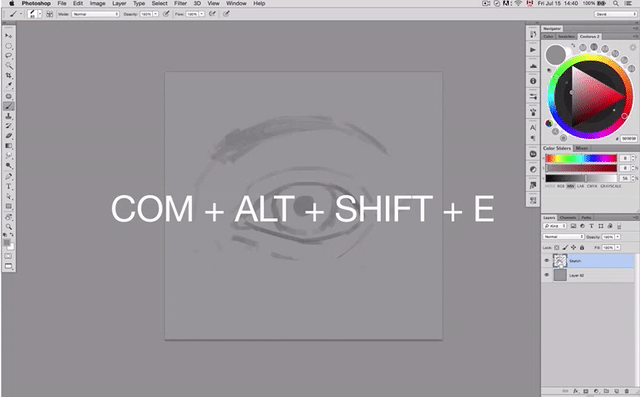
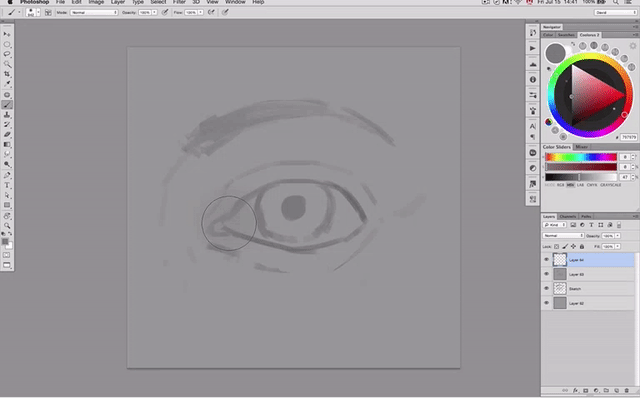
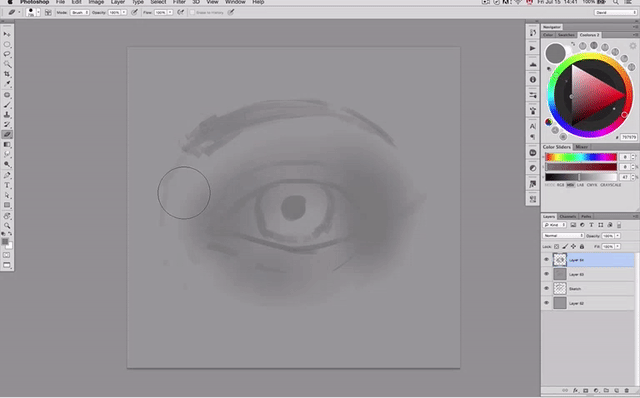
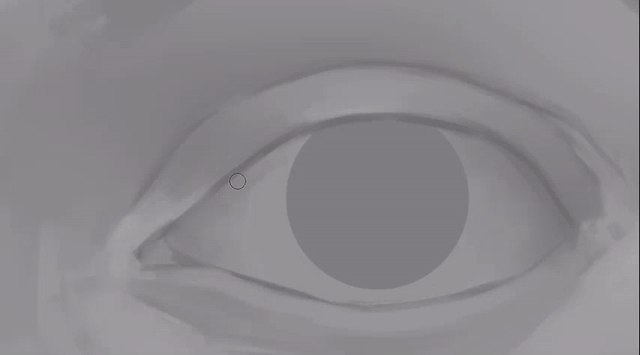
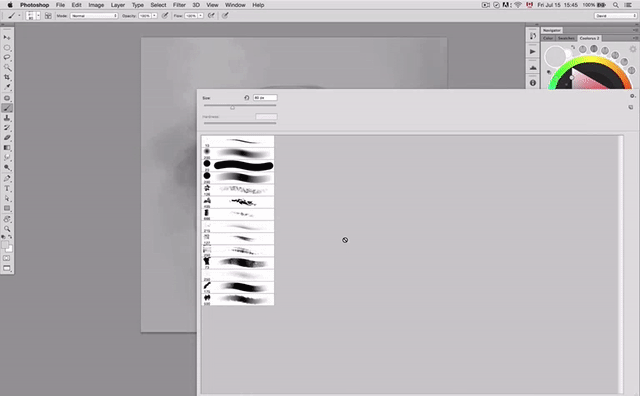
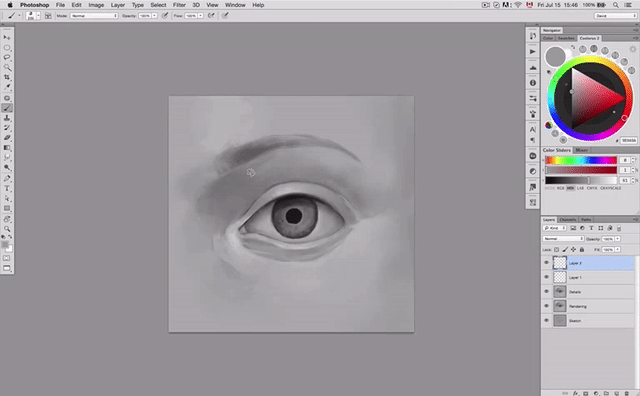
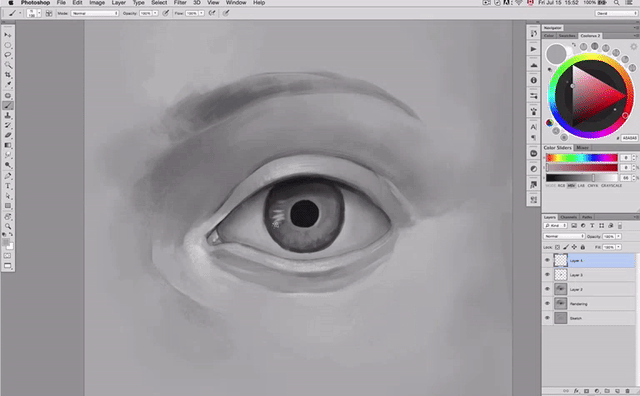
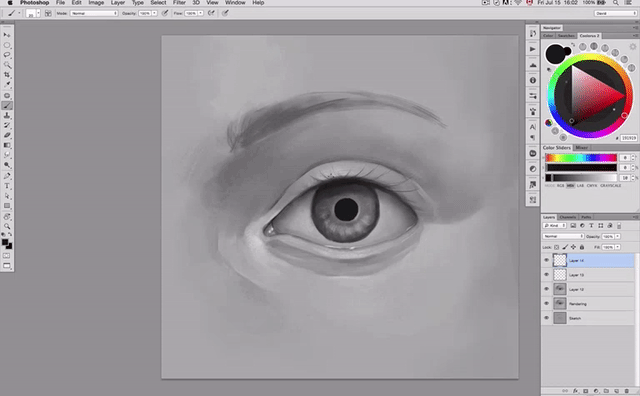
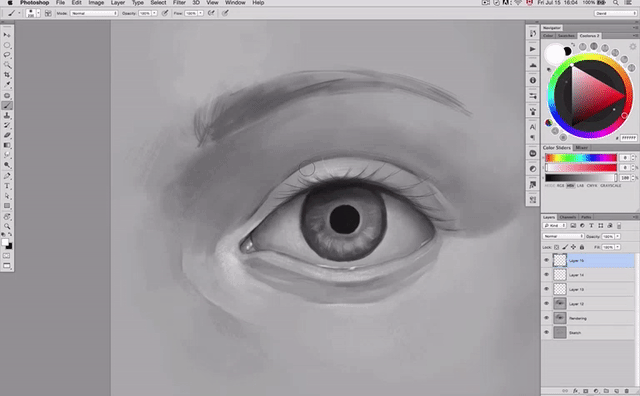
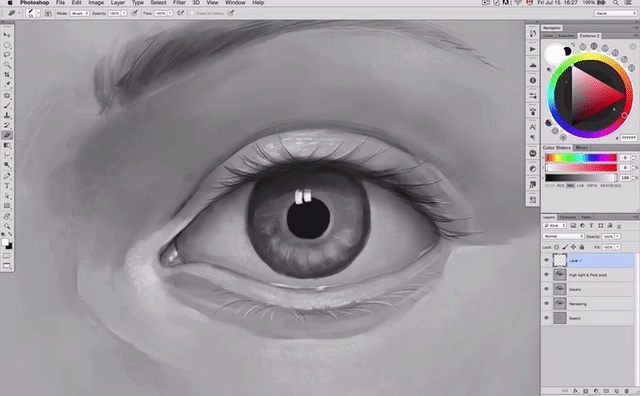
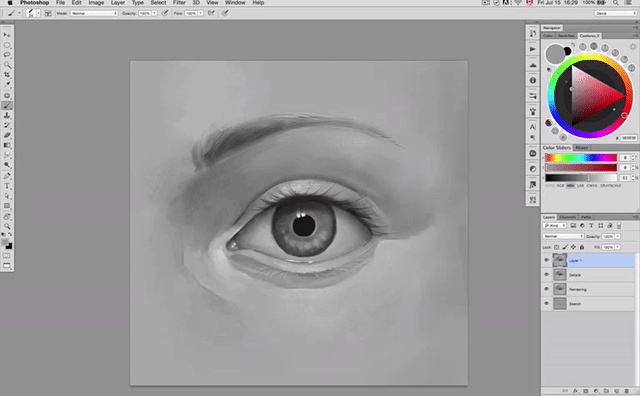
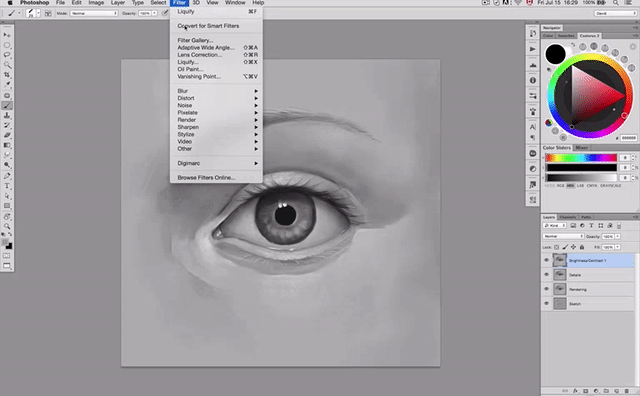
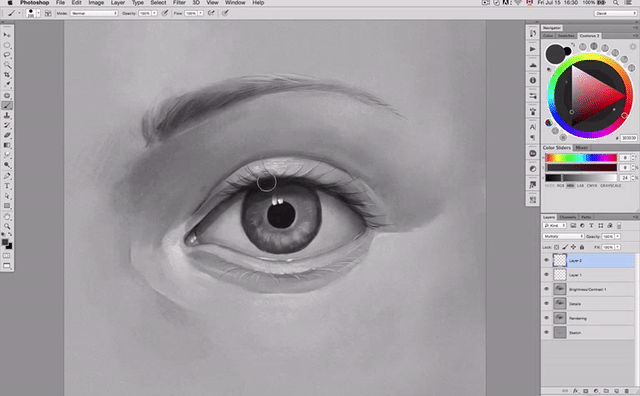
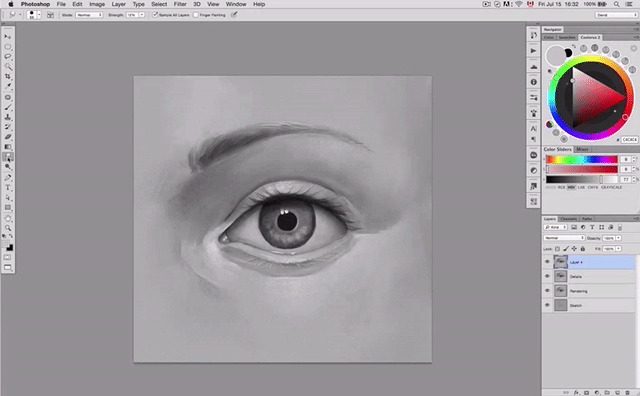
The post How to Paint Realistic Eyes: The Ultimate Guide appeared first on Paintable.